funcai / funcai-php
High performance, state of the art machine learning in php
Installs: 156
Dependents: 0
Suggesters: 0
Security: 0
Stars: 5
Watchers: 2
Forks: 1
Open Issues: 0
Language:C
pkg:composer/funcai/funcai-php
Requires
- php: ^7.4.0|^8.0
- ext-curl: *
- ext-ffi: *
- ext-gd: *
- ext-json: *
- ext-phar: *
Requires (Dev)
- friendsofphp/php-cs-fixer: ^3.1
- phpstan/phpstan: ^0.12.98
- phpunit/phpunit: ^9
- dev-main
- v0.5.4
- v0.5.3
- v0.5.2
- v0.5.1
- v0.5.0
- v0.4.3
- v0.4.2
- v0.4.1
- v0.4.0
- v0.3.0
- v0.2.2
- v0.2.1
- v0.2.0
- v0.1.6
- v0.1.5
- v0.1.4
- v0.1.3
- v0.1.2
- v0.1.1
- dev-feature/add-image-classification-application
- dev-feature/update-tensorflow-to-2.6
- dev-feature/add_applications_export
- dev-feature/load_custom_op
- dev-feature/generate-headlines
This package is auto-updated.
Last update: 2026-01-26 06:16:44 UTC
README
🌟 FuncAI PHP 🌟
FuncAI is a high performance, state of the art machine learning library for PHP.
It has no dependencies and can run everywhere PHP can run.
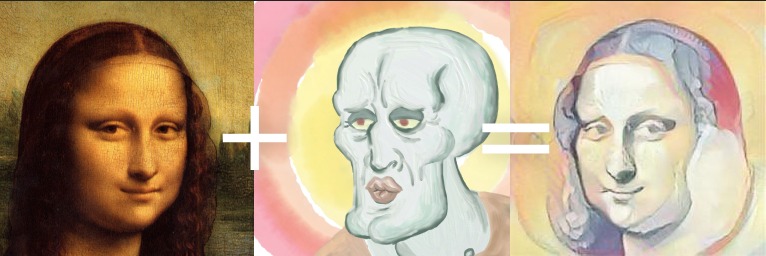
🖼️ Image stylization 🖼️
Apply the style of one image to another image.Example
Use it for:
- Generating artistic versions of user provided images
- Ensuring a consistent style of cover images
- For anonymizing avatars
Credits
🏷️ Image classification 🏷️
Find out what's in an image. Returns the top 5 classes out of a list of 21.825 classes.Example
Use it for:
- Making your images searchable by content
- Automatically generating image names or alt attributes
- Grouping your images by content
Credits
Future applications
- Image recognition - Get a label for a given image (in progress)
- Image upscaling - Increase the size of your images (in progress)
- Sentiment analysis - Find out if a user generated text is positive or negative (in progress)
- Time series forecasting - Predict what will happen in the future based on past events (planned)
- Text summary - Generate a summary from a given text (in progress)
- Translation - Translate your text from one language to another (planned, https://ai.googleblog.com/2017/04/introducing-tf-seq2seq-open-source.html, https://huggingface.co/facebook/mbart-large-50-many-to-many-mmt, https://google.github.io/seq2seq/nmt/)
If you have a usecase that's not listed above, please create an issue and explain what you would like to do.
Features
- Runs everywhere - You only need PHP, nothing else
- Super simple API - No machine learning knowledge required
- Many applications - Wide range of machine learning applications ready to use
Installation
1. Install the package via composer:
composer require funcai/funcai-php
2. Download the tensorflow library:
php vendor/funcai/funcai-php/install.php
This downloads tensorflow to ./tensorflow.
3. Download a model
php vendor/funcai/funcai-php/install-stylization.php
This downloads the stylization model to ./models
4. Configure the models folder
You will need to move the models folder to a permanent location.
For example, move it to /var/www/models on your server. In that case make sure to set the base path accordingly:
\FuncAI\Config::setModelBasePath('/var/www/models');
You can also move the folder directly into your project and check them into git, but the folder might get quite big (100 Mb up to multiple Gb).
Usage
After you've completed the installation steps you can run your first prediction:
\FuncAI\Config::setLibPath('./tensorflow/'); // This should point to the path from step 2
\FuncAI\Config::setModelBasePath('./models'); // This should point to the path from step 4
$model = new \FuncAI\Models\Stylization();
$model->predict([
__DIR__ . '/sample_data/prince-akachi.jpg',
__DIR__ . '/sample_data/style.jpg',
]);
This will output the stylized image to ./out.jpg.
Requirements
- PHP >= 7.4 on Linux
About machine learning
todo
- Pick the correct tasks (easy for computer, hard / repetitive for humans)
- Responsibility (https://www.tensorflow.org/responsible_ai)
- Uncertainty
- Specific tasks
How to run the docker file
- Run
docker-compose up -d - Run
docker-compose exec app bash - Run
php example.php
Architecture
- Uses FFI to talk to tensorflow for predictions
- Uses a custom written c++ program for training (in progress)
- Currently runs on linux with CPU support
Todo
- Fix path of libtensorflow.so in tf_singlefile.h
- Find a better way to download/host models
- Check for memory leaks
Development
Docker (optional, but recommended)
Install Docker.
Download the efficientnet model
To be able to run the example file you need to run the following docker command which will download the efficientnet model and save it in the correct file format:
docker run -it --rm -v $PWD:/code -w /code tensorflow/tensorflow:2.3.0 python scripts/generate/efficientnet.py
Alternatively, if you already have python3 installed you can directly run:
pip3 install tensorflow
python3 scripts/generate/efficientnet.py
Run the provided Docker container (optional)
To start the provided Docker container which provides you with a working php7.4 installation run:
docker-compose up -d
Afterwards run:
docker-compose exec app bash
to get a Terminal inside of the docker container.
Alternatively you can setup a PHP 7.4 environment locally and use that.
Better phpstorm support (optional)
Go to your settings and open "Languages & Frameworks -> PHP -> PHP Runtime -> Others". Make sure "FFI" is checked.


