in2code / in2tiptap
Installs: 7
Dependents: 0
Suggesters: 0
Security: 0
Stars: 8
Watchers: 1
Forks: 2
Open Issues: 8
Language:JavaScript
Type:typo3-cms-extension
pkg:composer/in2code/in2tiptap
Requires
- php: >=8.3.0
- typo3/cms-core: ^13.4
Requires (Dev)
- typo3/cms-backend: ^13.4
- typo3/cms-belog: ^13.4
- typo3/cms-beuser: ^13.4
- typo3/cms-dashboard: ^13.4
- typo3/cms-extbase: ^13.4
- typo3/cms-extensionmanager: ^13.4
- typo3/cms-felogin: ^13.4
- typo3/cms-filelist: ^13.4
- typo3/cms-filemetadata: ^13.4
- typo3/cms-fluid: ^13.4
- typo3/cms-fluid-styled-content: ^13.4
- typo3/cms-form: ^13.4
- typo3/cms-frontend: ^13.4
- typo3/cms-impexp: ^13.4
- typo3/cms-indexed-search: ^13.4
- typo3/cms-info: ^13.4
- typo3/cms-install: ^13.4
- typo3/cms-lowlevel: ^13.4
- typo3/cms-rte-ckeditor: ^13.4
- typo3/cms-scheduler: ^13.4
- typo3/cms-seo: ^13.4
- typo3/cms-setup: ^13.4
- typo3/cms-tstemplate: ^13.4
README
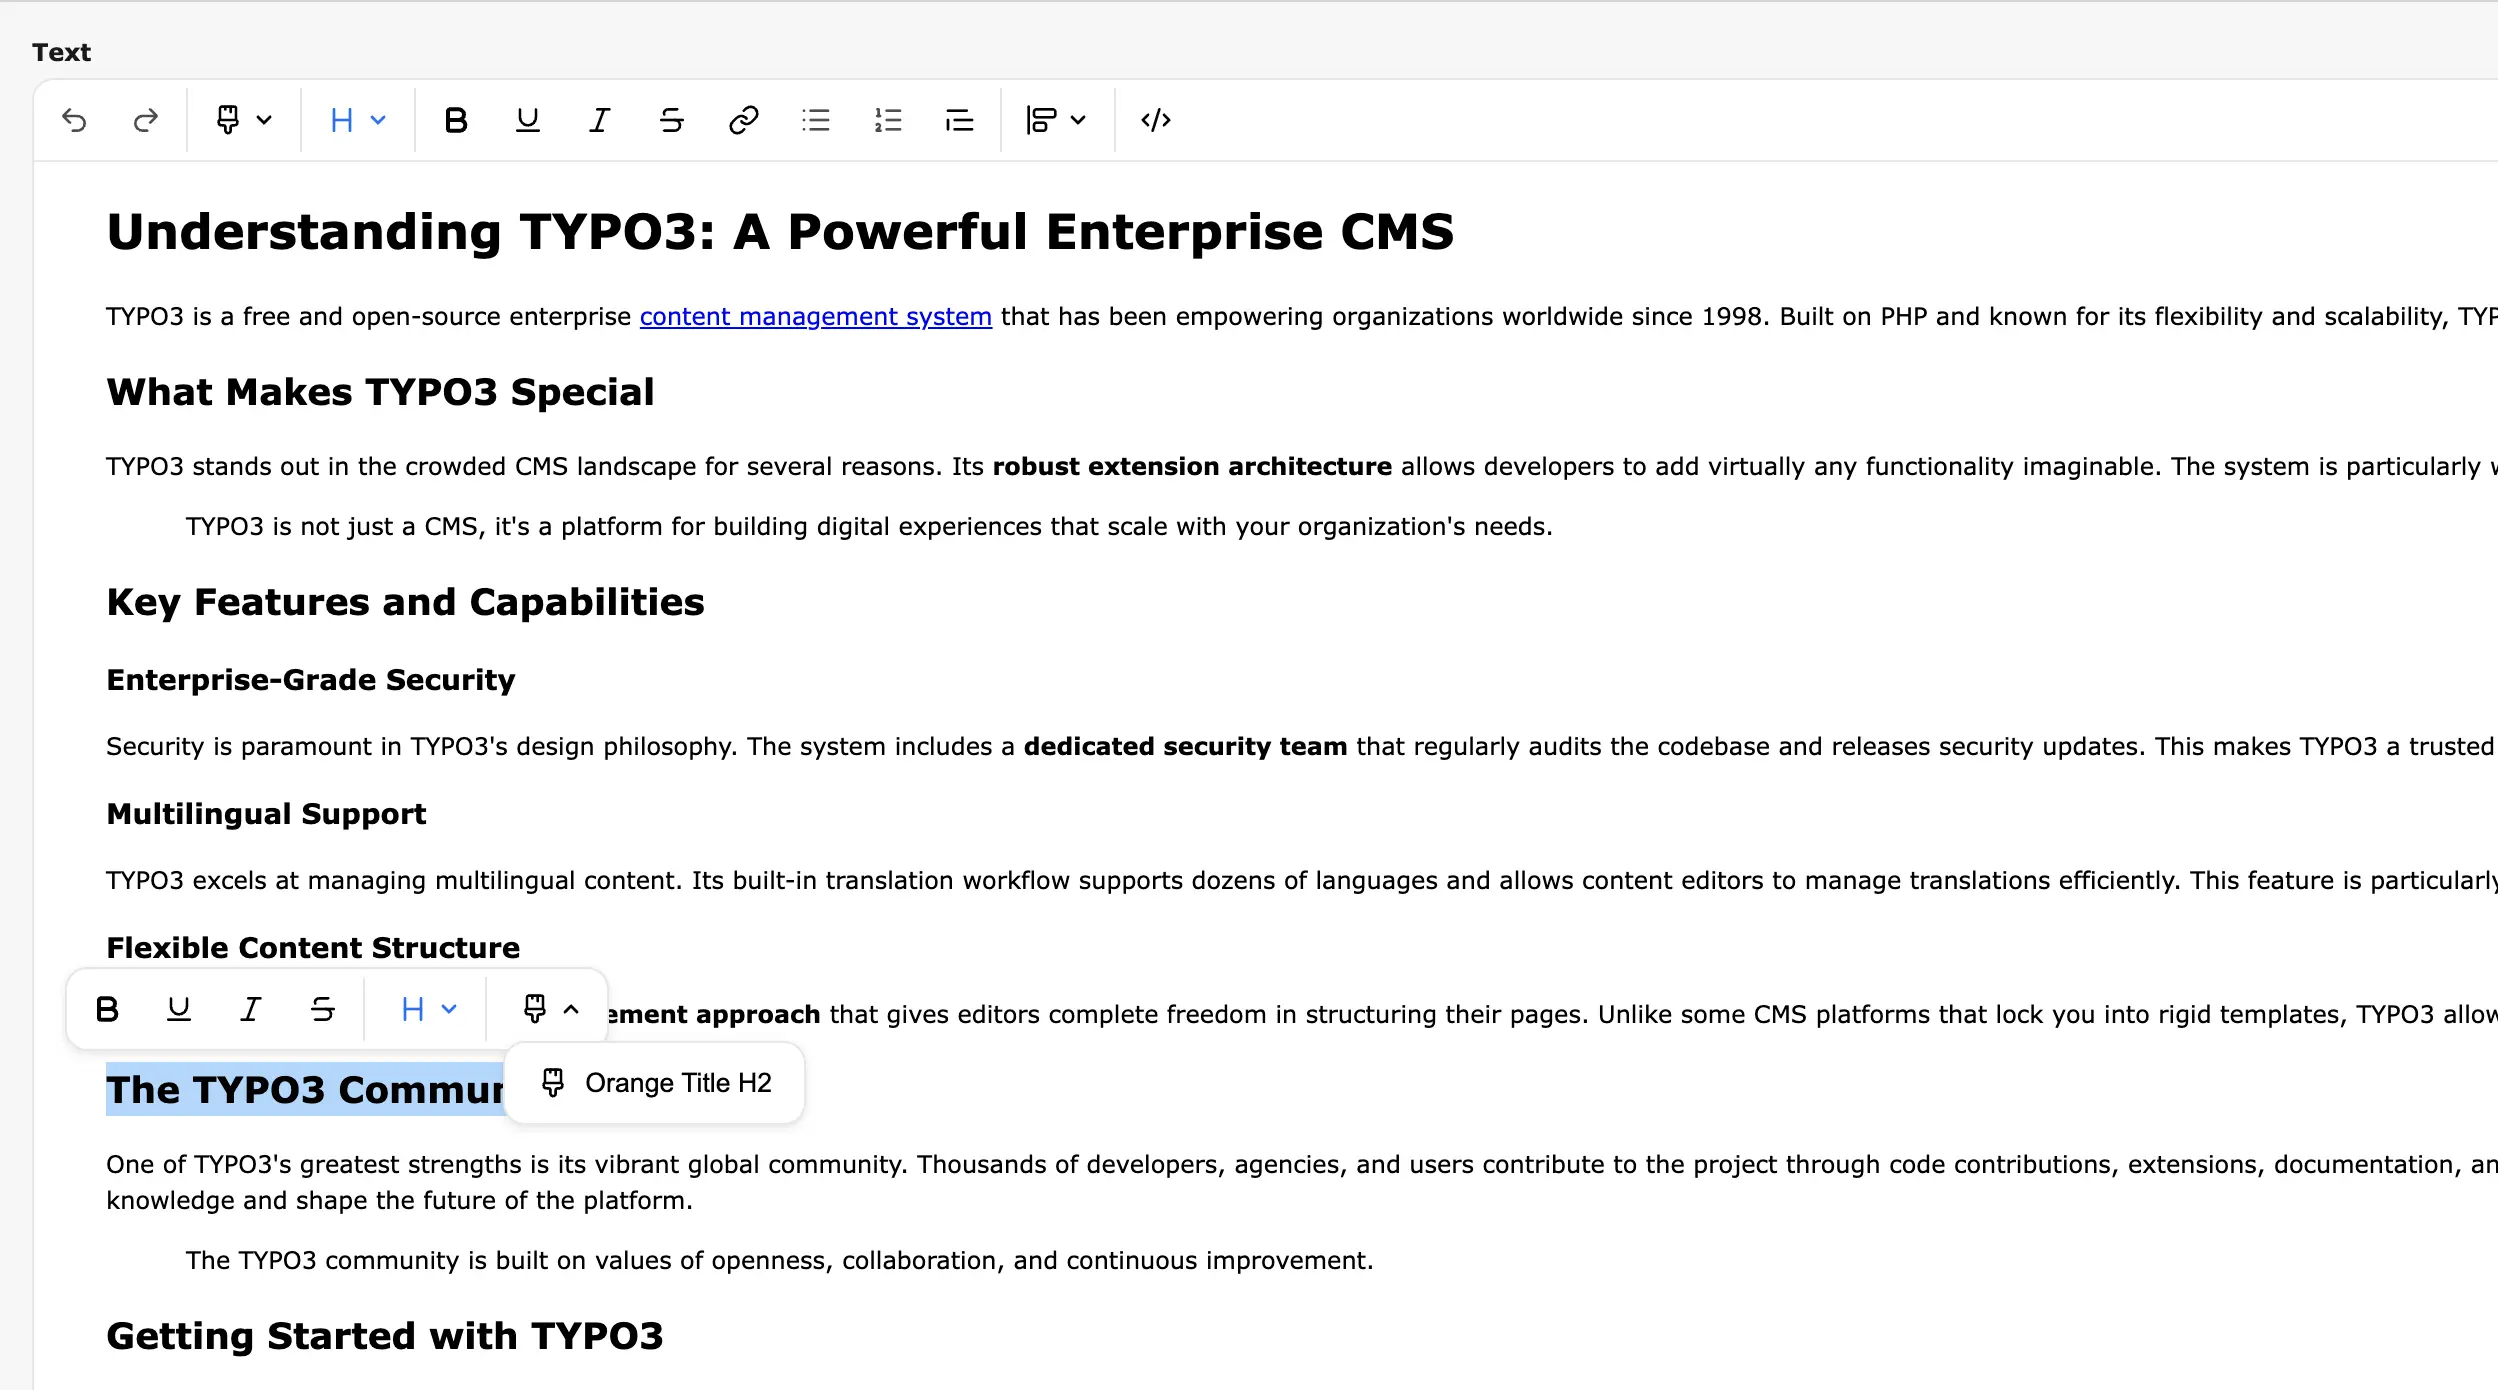
This extension provides a modern TipTap rich text editor integration for TYPO3 CMS.
The development of this extension was funded by the TYPO3 Association through the Community Ideas program.
Quick Start Guide
Install the extension via Composer:
composer require in2code/typo3-tiptap
You don't have to remove the CkEditor extension; both editors can coexist.
The editor comes with a default configuration that works out of the box. You can start using it immediately without any additional setup. If you want to use the default configuration, make sure to not overwrite the preset in your Page TSconfig.
Optional: Customize the Configuration
If you want to customize the editor to your specific needs, you can overwrite the default configuration:
- Copy the example YAML configuration file to your site package
- Customize it according to your requirements
- Register your custom preset in TYPO3:
// Setup custom editor configuration
$GLOBALS['TYPO3_CONF_VARS']['RTE']['Presets']['my_custom_preset'] = 'EXT:sitepackage/Configuration/RTE/TipTap.yaml';
- Activate the custom preset in your Page TSconfig:
RTE.default.preset = my_custom_preset
See also the documentation How do I use a different preset?
Configuration
Understanding the Architecture
TipTap uses a plugin-based architecture where functionality is added through plugins. Like CKEditor, TipTap is configured using YAML files placed in your site package at Configuration/RTE/.
The extension ships with a default configuration that includes commonly used features. You only need to create a custom configuration if you want to modify the toolbar, add custom plugins, or adjust the editor behavior.
Configuring the Toolbar
Each plugin can have its own configuration options that are validated in the frontend. Below is a complete example showing all available plugins. You can enable or disable any plugin by adding or removing its entry:
editor:
    tiptap:
        config:
            plugins:
                - path: '@typo3-tiptap/tiptap/plugins/headings.js'
                  config: { levels: [1, 2, 3, 4, 5, 6] }
                - path: '@typo3-tiptap/tiptap/plugins/history.js'
                  config: { types: [ 'undo', 'redo' ] }
                - path: '@typo3-tiptap/tiptap/plugins/bold.js'
                - path: '@typo3-tiptap/tiptap/plugins/underline.js'
                - path: '@typo3-tiptap/tiptap/plugins/italic.js'
                - path: '@typo3-tiptap/tiptap/plugins/strikethrough.js'
                - path: '@typo3-tiptap/tiptap/plugins/link.js'
                - path: '@typo3-tiptap/tiptap/plugins/list.js'
                  config:
                      types: [ 'ordered', 'bullet' ]
                - path: '@typo3-tiptap/tiptap/plugins/blockquote.js'
                - path: '@typo3-tiptap/tiptap/plugins/justify.js'
                  config:
                      types: [ 'justify-left', 'justify-center', 'justify-right' ]
                - path: '@typo3-tiptap/tiptap/plugins/source.js'
                - path: '@typo3-tiptap/tiptap/plugins/styles.js'
                  config:
                      styles:
                          - { name: 'Orange Title H2', element: 'h2', classes: 'orange' }
                          - { name: 'Orange Title H3', element: 'h3', classes: 'orange' }
                          - { name: 'Paragraph Blue', element: 'p', classes: 'paragraph-blue' }
                          - { name: 'Link Green', element: 'a', classes: 'link-green' }
Loading Custom CSS
You can load additional CSS files for the editor content using the contentCss option:
editor:
  tiptap:
    config:
      contentCss:
        - 'EXT:sitepackage/Resources/Public/Css/content.css'
Creating Custom Plugins
You can extend TipTap with custom plugins by creating JavaScript files in your site package and referencing them in your RTE configuration.
Step 1: Register Your Plugin
Add your plugin to the RTE YAML configuration:
editor:
  tiptap:
    config:
      plugins:
        - path: '@example/in2code/Plugins/example.js'
          config: # Optional plugin configuration
            additionalClass: 'my-example-class'
Step 2: Create the Plugin File
Create your plugin JavaScript file. Configuration is optional—if you don't need it, simply remove the unsafeConfig and parseTipTapPluginYamlConfiguration parts.
import {
    defineTipTapPlugin,
    parseTipTapPluginYamlConfiguration,
} from '@typo3-tiptap/tiptap/index.js'

export default function (unsafeConfig) {
  // Parse plugin configuration from YAML to ensure it matches expectations
  // Configuration parsing uses Zod validation. Learn more: https://zod.dev/
  const config = parseTipTapPluginYamlConfiguration({
    pluginId: 'cookie',
    config: unsafeConfig,
    getValidationSchema: z => z.object({
      additionalClass: z.string(), // requires additionalClass to be provided and be a string
    }),
  })

  defineTipTapPlugin({
    // Optional: Add custom TipTap extensions here if needed
    extensions: [],

    // Commands define buttons added to the toolbar or bubble menu
    commands: [
      {
        id: 'cookie',
        label: 'Add cookie',
        iconIdentifier: 'icon-cookie',
        position: {
          // Valid toolbar group IDs: history, styles, heading, general, formatting, developer
          toolbarGroupId: 'general',
          // Valid bubble menu group IDs: formatting, heading, styles
          // Set to false to disable button in bubble menu or toolbar
          bubbleMenuGroupId: false,
        },
        // Optional status functions to control button state
        status: {
          isActive: ({ editor }) => editor.isActive({ textAlign: 'right' }),
          isDisabled: ({ editor }) => !editor.can().setTextAlign('right'),
        },
        // This function executes when the button is clicked
        // Add your TipTap logic here
        onExecute: ({ editor }) => {
          editor.commands.setCookieButton({
            text: 'Accept Cookies',
            class: config.additionalClass
          })
        },
      },
    ],
  })
}
Learning by Example
The plugin structure may seem abstract at first. We recommend reviewing the existing plugins in the source code and using them as templates for your own implementations.
FAQ
#1755159351 MissingEditorConfigurationException: Missing editor configuration for tiptap
Most probably you have already customized your CKEditor presets. Search e.g. your site package for $GLOBALS ['TYPO3_CONF_VARS']['RTE']['Presets'] and change it to the TipTap YAML file with one of the following configurations:
// Use the shipped configuration  file
$GLOBALS['TYPO3_CONF_VARS']['RTE']['Presets']['my_custom_preset'] = 'EXT:typo3_tiptap/Configuration/RTE/Full.yaml';
// Setup custom editor configuration
$GLOBALS['TYPO3_CONF_VARS']['RTE']['Presets']['my_custom_preset'] = 'EXT:sitepackage/Configuration/RTE/TipTap.yaml';
Local Development
For instructions on setting up the project for local development, please refer to the Local Setup Documentation.

