brandung / factfinder-magento2
FACTFinder Webcomponents SDK
Installs: 409
Dependents: 0
Suggesters: 0
Security: 0
Stars: 0
Watchers: 0
Forks: 17
Type:magento2-module
pkg:composer/brandung/factfinder-magento2
Requires
- php: ^7.1
- magento/framework: >=101.0.0
- magento/module-catalog: >=102.0.0
- magento/module-configurable-product: >=100.2.0
- magento/module-directory: >=100.2.0
- magento/module-store: >=100.2.0
- magento/zendframework1: ^1.13
Requires (Dev)
- magento-ecg/coding-standard: ^3.1
- phpunit/phpunit: >=6.0 <8.0
- squizlabs/php_codesniffer: ^3.4
- dev-develop
- v1.3.2
- v1.3.1
- v1.3.0
- v1.2.0
- v1.1.2
- v1.1.1
- v1.1.0
- v1.0.0
- v0.9-beta.11
- v0.9-beta.10
- v0.9-beta.9
- v0.9-beta.8
- v0.9-beta.7
- v0.9-beta.6
- v0.9-beta.5
- dev-fix-translations-in-store-emulation
- dev-fix-export-translations
- dev-wip
- dev-add-console-command
- dev-index-products-only-assigned-stores
- dev-server-store-specific
- dev-master
- dev-feature/ffweb-324-add-to-cart-ajax
- dev-feature/ffweb-1298-full-export-service
This package is auto-updated.
Last update: 2026-02-15 13:06:50 UTC
README
This document helps you integrate the FACT-Finder Web Components SDK into your Magento 2 Shop. In addition, it gives a concise overview of its primary functions. The first chapter Installation walks you through the suggested installation processes. The second chapter “Backend Configuration” explains the customisation options in the Magento 2 backend. The final chapter Web Component Integration describes how the web components interface with the shop system and how to customise them.
Requirements
This module supports:
- Magento 2 version 2.2 and higher
- PHP version 7.1 and higher
Warning: PHP 7.0 is not supported
Installation
To install module, open your terminal and run the command:
composer require omikron/magento2-factfinder
Alternatively, you may want to add module reference to composer.json file:
"require": {
    "omikron/magento2-factfinder": "VERSION YOU WANT TO INSTALL"
}
and run command:
composer update
If, for some reason, composer is not available globally, proceed to install it following the instructions available
on the project website.
Activating the Module
From the root of your Magento 2 installation, enter these commands in sequence:
php bin/magento module:enable Omikron_Factfinder
php bin/magento setup:upgrade
As a final step, check the module activation by running:
php bin/magento module:status
The module should now appear in the upper list List of enabled modules.
Also, check in the Magento 2 backend "Stores → Configuration → Advanced → Advanced" if the module output is activated.
Backend Configuration
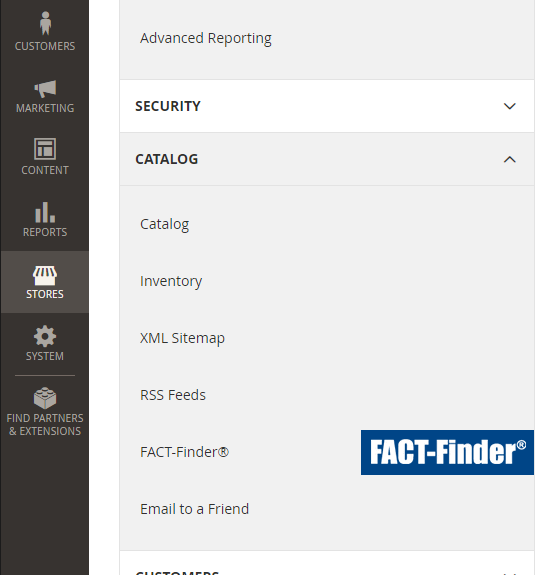
Once the FACT-Finder module is activated, you can find the configurations page under "Stores → Configuration → Catalog → FACT-Finder". Here you can customise the connection to the FACT-Finder service. You can also activate and deactivate single web components, as well as access many additional settings.
General Settings
At the top of the configurations page are the general settings. The information with which the shop connects to and authorises itself to the FACT-Finder Service are entered here. In the first line, activate your FACT-Finder integration. Before any changes become active, save them by clicking “Save Config”. In some cases, you need to manually empty the cache (Configuration and Page Cache).
Click the button “Test Connection” to check the connection to the FACT-Finder service. Please note the channel name needs to be entered correctly to establish a connection.
At the end of the general settings section is an option Show 'Add to Cart' Button in Search Results. Activate this option to add a button to the products displayed on the search result page, which directly adds that product to the shopping cart. Warning: The product added to the cart is identified by the variable "MasterProductNumber". To allow this function to work correctly, the field "MasterProductNumber" must be imported to the FACT-Finder backend (on fact-finder.de).
Activate Web Components
Here you can decide which web components are activated. Only active web components can be used and displayed in the shop.
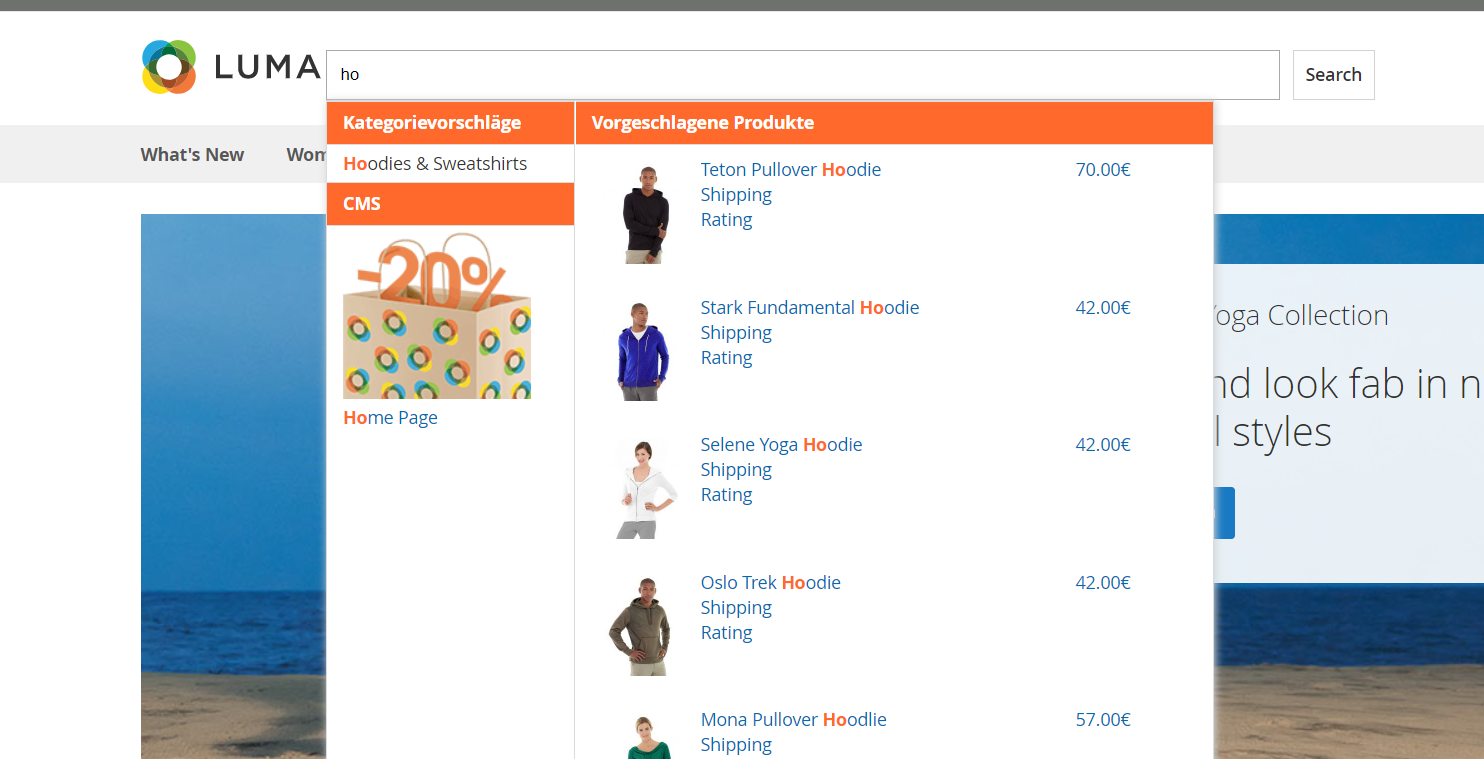
- Suggestions activates loading and displaying suggestions while search terms are entered into the search bar.
- Filter / ASN activates the functions to narrow down and refine search results.
- Paging activates paging through the returned search results.
- Sorting activates a sorting function for returned search results.
- Breadcrumb activates displaying the current position during a search. Can be refined with the Filter / ASN component.
- Products per Page activates an option to limit the number of displayed search results per page.
- Campaigns displays your active FACT-Finder campaigns, e.g. advisor and feedback campaigns.
- Pushed Products displays your pushed products campaigns.
Advanced Settings
Advanced Settings contains additional parameters used for the ff-communication web component. Each setting is set to a
default value and has a short explanatory text attached.
Product Data Export
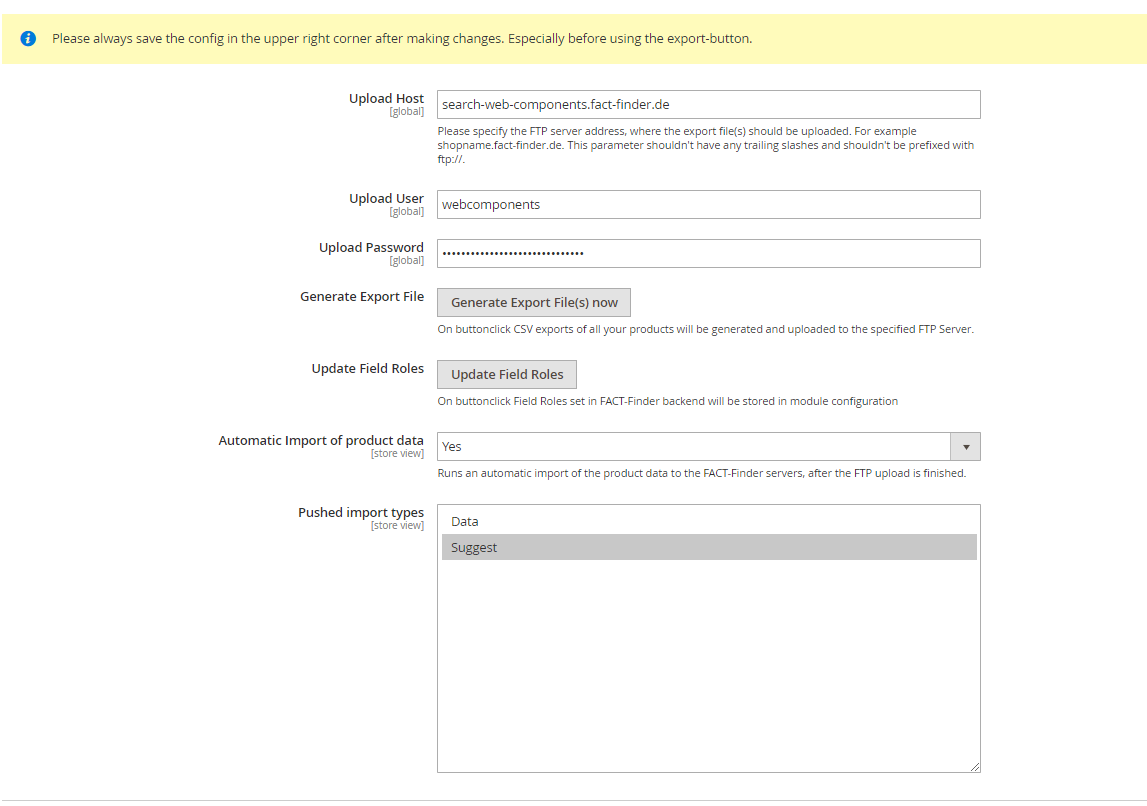
This option configures the connection with the FACT-Finder system via FTP. Shop data can be generated and transferred to FACT-Finder using FTP. FACT-Finder needs to be up to date on the product data, to ensure that components like the search work as intended.
Enter an FTP-server to which the CSV file is uploaded automatically. The URL needs to be entered without the protocol prefix (ftp://) and without the slash at the end.
The CSV file uses double quotes " for field enclosure and a semi-colon ; as field delimiter.
The Select additional Attributes option offers a multiple-choice list of attributes. Select all of those you want added to the CSV file.
Before starting the export by clicking Generate Export File(s) now, you need to commit all changes by clicking "Save Config".
The exception from that rule is Test Connection function which always takes the actual values from the corresponding fields.
Updating Field Roles
Field roles are assigned while creating new channel in FACT-Finder application, however they can be changed anytime. In this situations, You need to update field roles which are being kept in Magento database for tracking purposes.
To updates field roles, use the button Update Field Roles
Http Export
Feed export is also available to trigger by visiting specific URL, which is also able to be secured by Basic Auth (username and password configured at section Http Export). You can configure Your FACT-Finder application to download the feed directly from this location.
Exports are available under following locations:
https://YOUR_SHOP_URL/factfinder/export/product/store/YOUR_STORE_ID- for exporting product feed (or combined feed if You have cms export enabled and You've chosen to export product and cms data in one file)https://YOUR_SHOP_URL/factfinder/export/cms/store/YOUR_STORE_ID- for CMS export
If there's no store id provided, feed will be generated with the default store (by default with id = 1)
Cron configuration
You can set the program to generate the product data export automatically. Activate the option Generate Export Files(s) automatically and the export is generated every day at 01:00 server time.
<schedule>0 1 * * *</schedule> is a default value however You can define your own cron expression in the module configuration at Cron Schedule section.
CMS Export
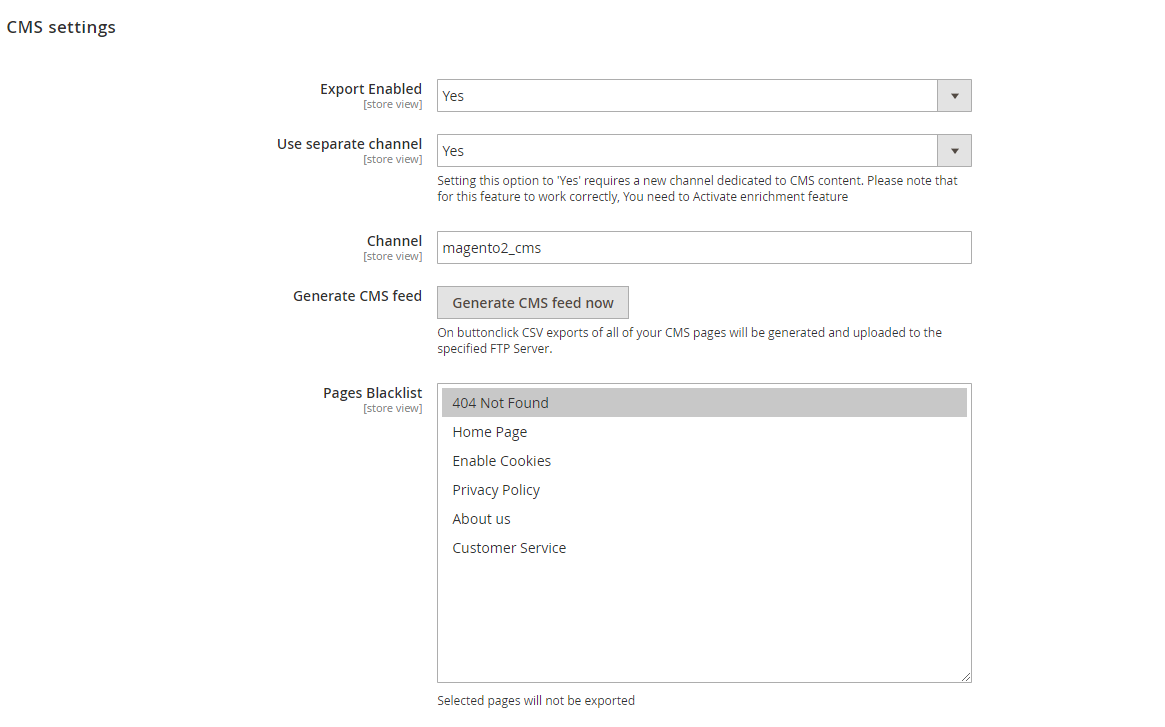
You can export Your cms pages to FACT-Finder to present them in suggest results. You can specify whether You want to export cms pages content to separate channel, or using single channel, which You are using for standard products information export. Both ways offer same functionality but in different ways and are described below.
- Export Enabled - determine if CMS content should be exported or not
- Use separate channel - determine if exported CMS content should be exported to standard channel, or to the different one. If this option is set to "Yes", additional field "Channel" appears where You need provide the name of channel which will serve CMS suggest results.
- Channel - Channel name used for CMS export. This field appears only if Use separate channel is turned on.
- Generate CMS Feed - On button click all CMS data is exported and uploaded to configured FTP server
- Pages Blacklist - allow user to filter out pages, which should not be exported, for example "404 Not Found page" should not be visible at suggested records
Before You start exporting Your CMS content to FACT-Finder You need to prepare it for correctly serving this data to Your Magento application.
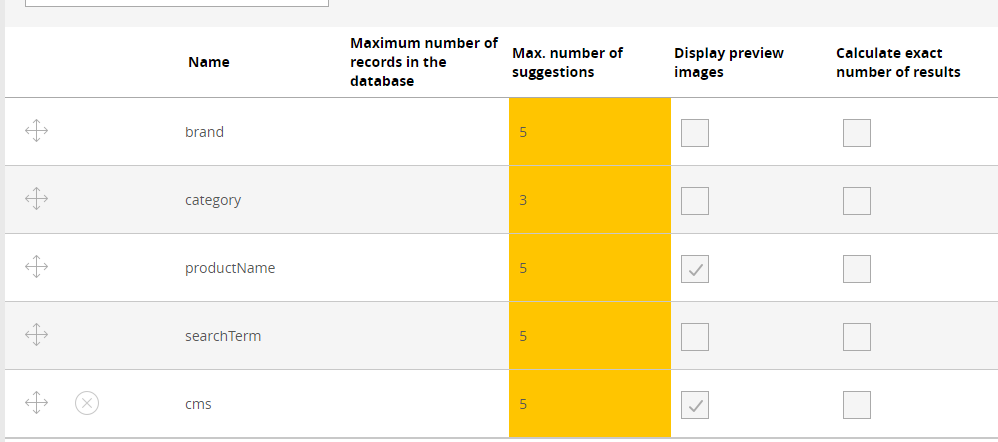
Create new suggest type
At first You need to create a new suggest type named cms. I'ts because the new was added with type attribute equals to"cms"
<ff-suggest-item type="cms">
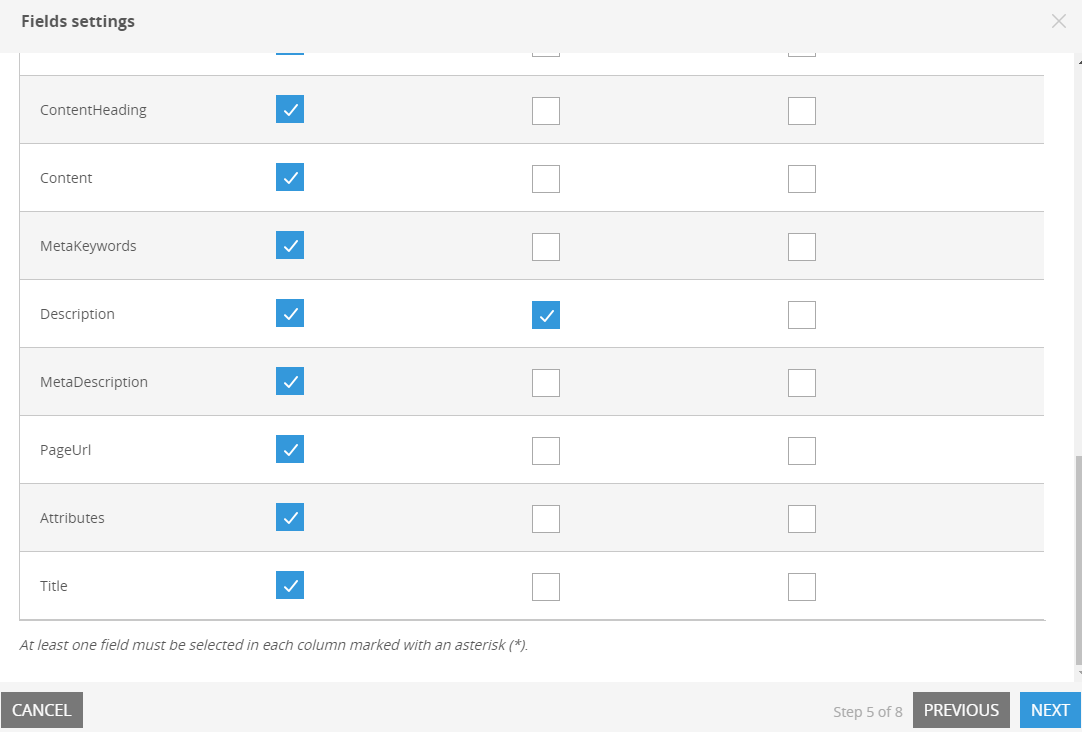
It's also required to configure the return data of newly created suggest type. It's recommended to set return data as it's shown on screen, however You can also choose more fields to be returned. You should add page url to returned data to allow users directly reaching them from suggest component. If You want to present also page images, it's also worth adding them to returned data
Please note that each field needs to be correctly bind to html tag using access path same as in the FACT-Finder JSON object. The example below shows how to render page url
<a href="{{attributes.PageLink}}" data-redirect="{{attributes.PageLink}}"'
Using Single Channel
Using single channel is recommended way of integrate Your CMS with FACT-Finder, however it requires additional configuration in FACT-Finder backend. In order to prevent CMS pages appears in search results You need to mark CMS related columns as no searchable (CMS results are displayed only in suggest component).
Using Separate channel
This solution does not require You to make any changes to channel configuration regarding columns searchability, however You need to create a new channel. You need also to add new suggest type in Your newly created channel, as it is described in section New Suggest Type. Also You need to set configuration option Activate Enrichment feature to value Yes in module configuration.
Despite the fact that due to the use of separate channels, the products data will not be mixed up with CMS, and you do not need to perform any additional operations to prevent CMS from appearing in the search results, this solution has one drawback. Two requests to FACT-Finder, will be performed in order to recieve full response: one for products and one for CMS content. To merge them before returning to browser, module uses proxy to prepare final response from two separate FACT-Finder response. Because of that, the performance of this solution will be lower, since all request are passed through Http server of Your Magento application.
Web Component Integration
You can activate and deactivate any web components from the configurations page in the Magento 2 backend.
The HTML code for the web components can be found in this folder:
src/view/frontend/templates/ff
The module styles can be found in this folder
src/view/frontend/web/css/source/ff
Since Magento 2 is using Less, all source styles are written in this stylesheet language
src/view/frontend/web/css/source/_module.less
Warning: After changing static content styles, you need to restart the Magento 2 environment, for Magento to be able to find them. Use this command:
php bin/magento setup:upgrade
php bin/magento setup:static-content:deploy
You can integrate the templates anywhere within your shop system. The recommended way is to use Magento2 layouts for that.
As an example, the ff-suggest element was integrated into the ff-searchbox template for this SDK:
<referenceBlock name="top.search">
    <action method="setTemplate" ifconfig="factfinder/general/is_enabled">
        <argument name="template" xsi:type="string">Omikron_Factfinder::ff/searchbox.phtml</argument>
    </action>
    <block class="Magento\Framework\View\Element\Template" name="factfinder.suggest" as="suggest" ifconfig="factfinder/components/ff_suggest" template="Omikron_Factfinder::ff/suggest.phtml">
        <block class="Magento\Framework\View\Element\Template" ifconfig="factfinder/cms_export/ff_cms_export_enabled" name="factfinder.suggest.cms" as="suggest.cms" template="Omikron_Factfinder::ff/suggest-cms.phtml">
            <arguments>
                <argument name="view_model" xsi:type="object">Omikron\Factfinder\ViewModel\Suggest</argument>
            </arguments>
        </block>
    </block>
</referenceBlock>
You can also instantiate block in templates using the Magento Layout API, but it's not a recommended way
<?php echo $this->getLayout()
->createBlock(\Magento\Framework\View\Element\Template::class)
->setTemplate('Omikron_Factfinder::ff/suggest.phtml')
->toHtml(); ?>
Search Box Integration and Functions
As soon as the FACT-Finder-Integration is activated in the configuration, the search box web component is automatically activated. It replaces your standard search in Magenteo 2.
You can find the template for the FACT-Finder Search at:
src/view/frontend/templates/ff/searchbox.phtml
Once you perform a search, you will automatically be redirected to a new and improved version of the Magento 2 search result page, which works with FACT-Finder data. Additionally, FACT-Finder enriches the new search result page’s URL with relevant data, like the search’s FACT-Finder channel or the search query string. The module’s source code contains the search results’ layout definition in this XML file:
src/view/frontend/layout/factfinder_result_index.xml
Several templates are already integrated into this layout, among others ff-record-list, which displays the search results.
Process of Data Transfer between Shop and FACT-Finder
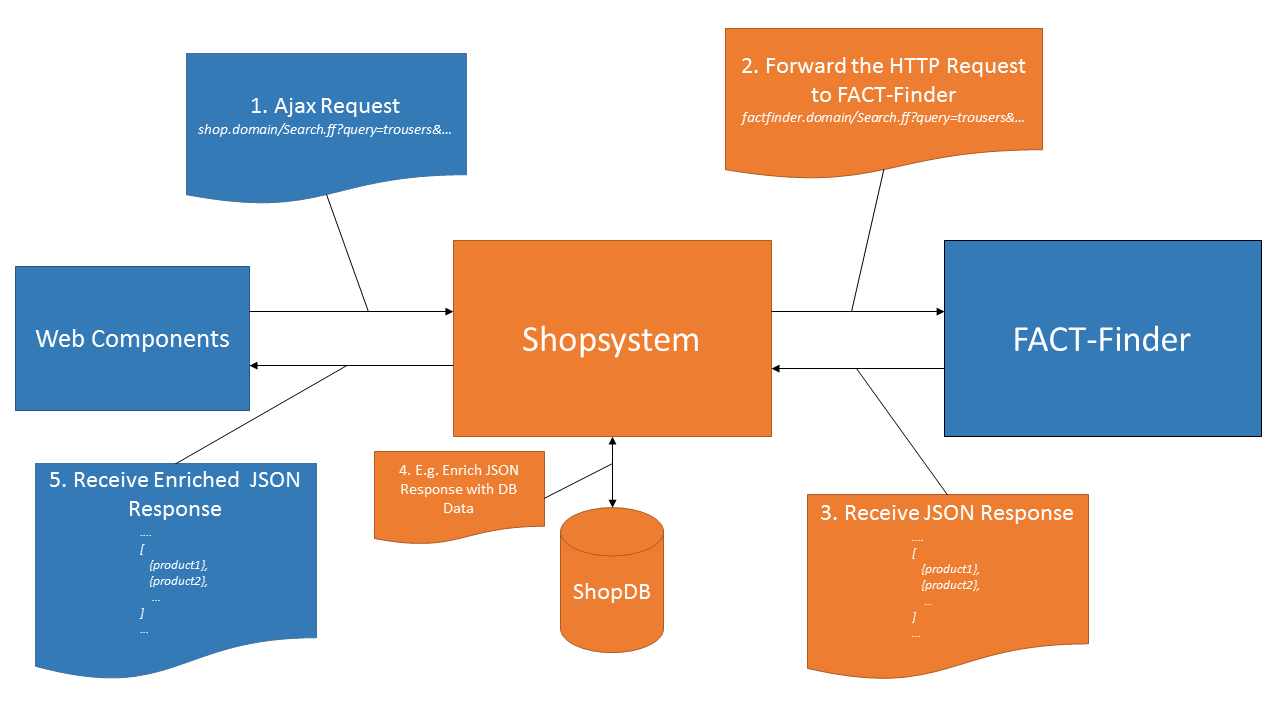
By default search/suggest requests are performed directly to FACT-Finder bypassing Magento backend. However if for some reason, You want to modify request parameters or want to modify the response before returning it to the front, You can enable Enrichment feature. By enabling this, once a search query is sent, it does not immediately reach FACT-Finder, but is handed off to a specific controller
src/Controller/Proxy/Call.php
which hands the request to the FACT-Finder system, receives the answer, processes it and only then returns it to the frontend/web component.
Once response from FACT-Finder is available, proxy controller emits an ff_proxy_post_dispatch event which allows user to listen in order to modify and enrich recieved data
Modification examples
Our Magento 2 module offers a fully working integration out of the box. However, most projects may require modifications in order to fit their needs. Here are some common customization examples.
Changing existing column names
The module has predefined column names defined in the main DI configuration etc/di.xml. These follow our feed best
practices. The default DataProvider is configured to export data for columns with same names, so in order to change column
name, you will need to add two modifications:
- Define new column name in your custom module
di.xml. The following code snippet shows how to change name for column Master Product Number (in module namedMaster):
<virtualType name="Omikron\Factfinder\Model\Export\CatalogFeed">
    <arguments>
        <argument name="columns" xsi:type="array">
            <item name="Master" xsi:type="string">CUSTOM_NAME</item>
        </argument>
    </arguments>
</virtualType>
- Once the column name is changed in
di.xml, add a plugin to the DataProvider and replace the standard name with new one. Remember that you don't need to copy rest of elements. They won't be removed because the DI configuration loading mechanism will merge all definitions into one output. Example implementation:
<type name="Omikron\Factfinder\Model\Export\Catalog\ProductType\SimpleDataProvider">
    <plugin name="custom-provider" type="YOUR_VENDOR\YOUR_MODULE\Plugin\AfterToArrayPlugin" />
</type>
public function afterToArray($subject, $result)
{
    return ['CUSTOM_NAME' => $result['Master']] + $result;
}
Finally, run bin/magento cache:clean config to replace old DI configuration with the one you just created.
Adding new column
The standard feed contains all data FACT-Finder® requires to work. However, you may want to export additional information which is relevant for your project and not part of a default Magento 2 installation. In order to do so, let's take a look into the DataProvider definition:
<type name="Omikron\Factfinder\Model\Export\Catalog\ProductType\SimpleDataProvider">
    <arguments>
        <argument name="productFields" xsi:type="array">
            <item name="ImageURL" xsi:type="object">Omikron\Factfinder\Model\Export\Catalog\ProductField\ProductImage</item>
            <item name="CategoryPath" xsi:type="object">Omikron\Factfinder\Model\Export\Catalog\ProductField\CategoryPath</item>
            <item name="Attributes" xsi:type="object">Omikron\Factfinder\Model\Export\Catalog\ProductField\Attributes</item>
        </argument>
    </arguments>
</type>
The constructor argument productFields stores references to specific fields that require more logic than simply retrieving
data from the product. Let's assume we want to add a new column BrandLogo containing image URLs. In your module DI, add
the new field definition:
<type name="Omikron\Factfinder\Model\Export\Catalog\ProductType\SimpleDataProvider">
    <arguments>
        <argument name="productFields" xsi:type="array">
            <item name="BrandLogo" xsi:type="object">YOUR_VENDOR\YOUR_MODULE\Model\Export\Catalog\ProductField\BrandLogo</item>
        </argument>
    </arguments>
</type>
Again, there is no need to copy all other field definitions: Magento will merge the existing ones with the one you just created.
In order for your field exporter to work, it has to implement our Omikron\Factfinder\Api\Export\Catalog\ProductFieldInterface.
Your class skeleton to export the brand logo could look like this:
class BrandLogo implements \Omikron\Factfinder\Api\Export\Catalog\ProductFieldInterface
{
    public function getValue(Product $product): string
    {
        // Getting products brand logo URL...
    }
}
Now run bin/magento cache:clean config to use the new DI configuration.
License
FACT-Finder® Web Components License. For more information see the LICENSE file.

